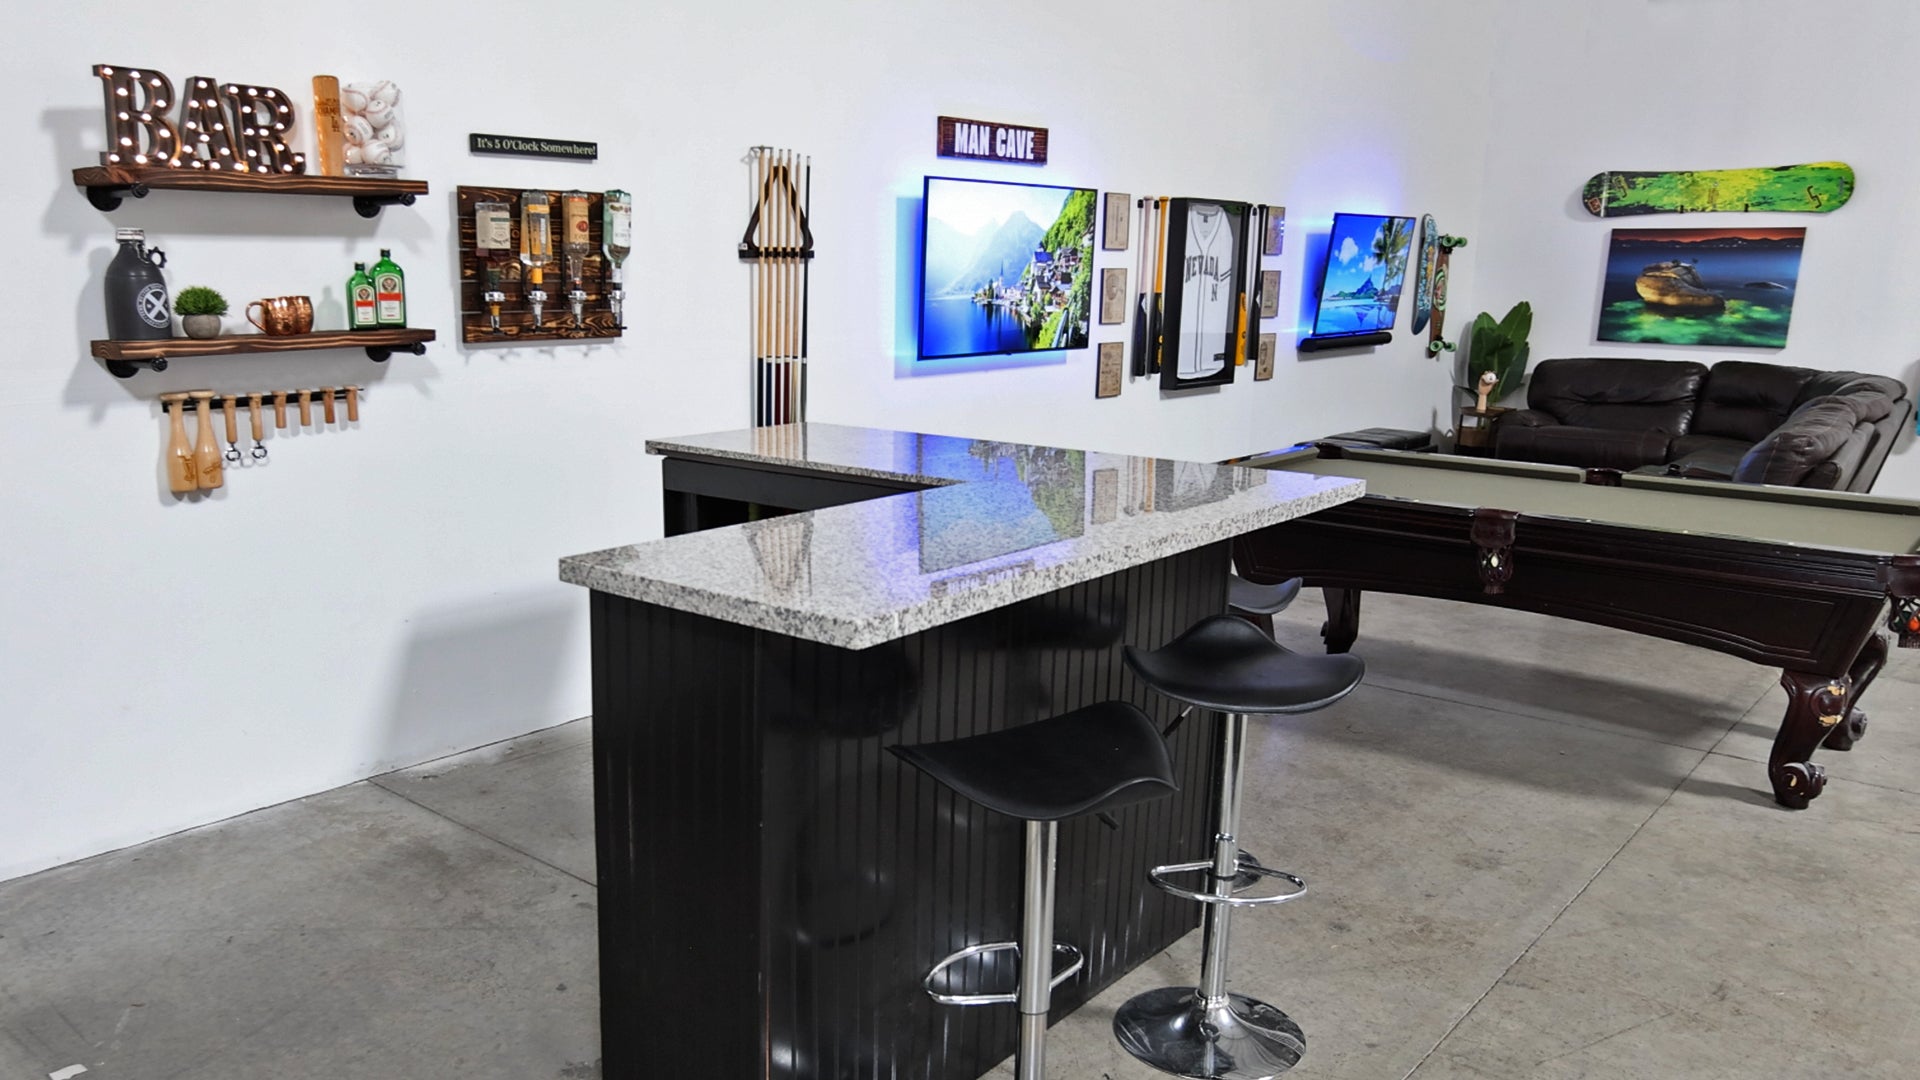
We built a Man Cave! After more than a decade of inspiring Instagram-worthy gaming setups, we're showing you each step of our Man Cave Transformation so you can do it, too!
Be sure to check out previous steps:
- Step 1: Get Started
- Step 2: Plan Your Space
- Step 3: Mount Your TV + Devices
- Step 4: Display Your Gear
- Step 5: Finishing Touches
Bonus Step: DIY Man Cave Decor - here's the details on all of the DIY projects we made for our Man Cave. They're so easy, you can do it yourself, too!
DIY: Framed Jersey in a Shadowbox Case
Framed jerseys are a great way to show off team pride and are a must-have for any Sports Themed Man Cave. The more, the merrier! Jerseys make for a great focal point or addition to a gallery wall. We used ours as a focal point between the TVs and the center of our gallery wall.
You Need:
- Jersey: You can use a jersey you already own or purchase one that you’ve had your eye on!
- Shadowbox Jersey Frame: Choose based on the size of your jersey. XS-M in a 30” by 36” and L-XXL in a 32” by 40”. We got ours from our local Hobby Lobby!
- Straight Pins: Use the pins to secure the jersey within the Jersey Frame. These are typically found with sewing supplies.
- Iron: You don't want to frame a wrinkled jersey! Iron and make sure it is wrinkle-free and looks fantastic!
How To DIYit:
- Iron Once: Lightly iron the entire jersey to remove unwanted wrinkles.
- Front or Back: Which side do you want to display? Note any sleeve details that you want to show.
- Lay it Out: Lay the jersey onto the foam backer board (included with the jersey frame) with display side facing up.
- Get Folding: This will take a few rounds of trial and error. Don't forget the patches or logos on the sleeves that you want to show. We folded the sleeves inward to display the sleeve patches.
- Pinup Time: Use the straight pins to secure the jersey to the foam backer board. Make sure that they will hold the jersey in place when vertical on the wall.
- Iron Twice: Iron the folds to help secure them and create a clean crease.
- Put it Together: Place the foam backer into the jersey frame and close it up.
- HANGit: The jersey frame has pre-drilled holes. It's a pretty heavy frame so an extra pair of hands is helpful.
SCREW HACK: Place painters tape along the back of the frame, reasonably taut, and press into the pre-drilled holes. Now you have a template to put on the wall making screw placement so much easier!

DIY: How to Burn Wood - inspired by the Shou Sugi Ban technique
We were taught how to burn wood by our dear friend, Fireman Chris. He has been inspired by the Japanese technique of burning wood to preserve it, make it stronger, and bring out the beauty of the grain. We opted for lightly burned look which is more rustic but doesn't have the same durability benefits. Since we're not using the wood outdoors, we were okay with the tradeoff and the finished look is simply stunning!
You Need:
- Torch: Propane utility torch aka plumbers torch but a kitchen torch can work for very small projects
- Torch Attachment: For big projects, you will want a large torch that attaches to a propane tank
- Brush: Wire brush or other fine brush with firm bristles
- Sandpaper: Heavy grit to remove excess char
- Gloves: Non-flammable work gloves that will protect from burns
- Eye Protection: Not from the light from the flame, from things that pop when burned
- Water: Spray bottle and a bucket of water or a hose, ready to put out unwanted fire
- Fire Extinguisher: You should have one in your kitchen anyway
- Scrap Wood: Use for support beams to prop up wood pieces
- Wood: Pine, redwood, or whatever you want to use - they all look different and burn different
- Stain: Optional but can really enhance the wood grain
We found an easy-to-understand video by Build Dad Build that breaks down the tools and basic process. If you really want to get into wood burning, dive into his How To Shou Sugi Ban playlist.
How to DIYit:
- Wood Prep: Choose your wood and cut to size. Try to use the same type of wood for your project so the burned finished pieces look similar. Look for dry wood; the wetter the wood the longer the burn will take.
- TIP: Old wood works great! Burning off the top layer brings it back to life!
- Burn Baby Burn: Choose your torch based on the size of your project, starting small if you're a beginner. We went for a "zebra" look. How much heat you apply determines how dark the wood gets. Just remember, you can always go darker, but you can't go lighter.
- TIP: To darken small spots, use the smaller torch. This is perfect for darkening knots.
- Brush: Use a fine brush to brush down the wood, with the wood grain, to remove char. If you want to go darker, you can add additional heat and repeat the process. If the brush is not enough to remove the char, use sandpaper.
- TIP: For larger projects, you can use water to wash off excess dust.
- Finish: Use mineral oil or lacquer as a finish. The lacquer will darken the overall finish - as if it is wet.
DISCLAIMER: Playing with fire is dangerous. Be sure to take all safety precautions!

DIY: Man Cave Wood Sign
Wood signs are a great way to fill empty wall space and add a touch of personality to your man cave. When you make your own, you can customize the sign to say whatever you want! We went generic here but this is the perfect place to add your name, a favorite saying or something relevant to your fave team like "Let's Go Halos!" or "I Bleed Dodger Blue."
You Need:
- A Piece of Wood: you can look at wood planks at your local hardware store or do what we did - we went to Hobby Lobby and found a piece of unfinished wood that was made to be a sign. Our sign. Plus it's super lightweight.
- Paint Supplies: we used a generic acrylic paint and brush, nothing fancy needed. Choose a color that is light so it will show against the darker color of the burned wood.
- Stencils: if you aren't a sign artist, stencils will help you make perfect letters. If you have a Cricut or similar cutting tool, you can make your own stencils.
- Mounting Hardware: if you're starting with just a plank of wood, you'll need mounting hardware.
How To DIYit:
- Burn the Wood: See above for instructions
- Get Stenciled: Lay out stencils on the wood. Center the letters both vertically + horizontally. Use painters tape to cover exposed wood and prevent paint overflow.
- Paint: Lighter colors will take a few coats. Let each coat dry fully before the next coat, per the directions, to ensure a nice, even finish.
- Let Paint Dry: Don't pull the stencil too soon! Make sure the paint is fully set before removing the stencils.
- Make it Mountable: Add mounting hardware (if needed), then install!

DIY: Alcohol Dispenser
This is a semi-homemade masterpiece! With just a few updates, we completely transformed what we bought and it looks like we made it all from scratch. Truth is, the longest part of this project was waiting for the paint to dry. This transformation was fast and easy, just how we like it.
What you need:
- Wood Board or Pallet: We purchased a pre-burned mini pallet from Hobby Lobby, then added more char to match our other burned wood pieces.
- Alcohol Dispenser: We used this one from Amazon. It's pretty flimsy, but we pulled it apart and mounted each dispenser separately onto the pallet making it more secure (and straight).
- Spray Paint: Optional. We chose to paint it black so the dispenser would coordinate better with our decor.
- Mounting Hardware: We used Sawtooth Mounting Hardware plus HIDEit drywall screws and anchors since we don't have wood studs to secure to.
How To DIYit:
- Burn the Wood: See above for instructions
- Install the Hardware: Add the Sawtooth Mounting Hardware to the back of the pallet. This is going to need to hold reasonable weight, so 1 is not enough! Install 2 or 3.
- Paint the Dispenser: If you don't want chrome, paint it! Our dispenser is made from electroplated plastic, so Rust-oleum Spray Paint worked well. If you have a dispenser like ours, take it apart before you paint and don't forget to paint the screw heads.
- Measure Twice: Measure and determine the placement for each bottle dispenser. This is optional, you can just install the whole piece onto your wood, but it looks so much better removing their framing and mounting directly to the wood. We miscalculated so DOUBLE CHECK YOUR MEASUREMENTS!
- Install Dispenser: Now that you have measured and re-measured, use wood screws to install the bottle dispensers. Hope you painted the screw heads!
- Wall Mount: Figure out your desired location. Using the masking tape Screw Hack (see above), you can easily determine where to install your screws.
- Fill 'er Up! Grab your favorite bottles of booze and pour me a drink!

DIY: Wood + Piping Floating Shelves
You've probably seen shelves like this. You can buy expensive variations from furniture stores, but this is actually an inexpensive, easy, yet gorgeous way to make a shelf! Added Bonus: You can customize your shelf size.
What you need:
- Wood Board: We looked for flat and not warped pieces that seemed pretty dry.
- Iron Pipe Pieces: For each shelf you'll need:
- (2) 3/4" floor flange
- (2) 8" long
- 3/4" diameter black pipe
- (2) 3/4" caps
- Spray Paint: Optional. We chose to paint it black so the dispenser would coordinate better with our decor.
- Mounting Hardware: Make sure to install into one stud. For wood studs, you won't need any anchors. For screws mounted into drywall, make sure to use a heavy-duty drywall anchor designed to support heavier weights.
- Mounting Tools: The usual suspects - drill, level, and tape measure.
How To DIYit:
- Burn the Wood: See above for instructions
- Paint the Pipes: If you don't want the iron look (which is definitely Farmhouse friendly), paint it! Again, our Rust-oleum Spray Paint worked well. Don't forget to paint the screw heads.
- Measure Twice: Always. Because it sucks having to fill holes that were made in haste. DOUBLE CHECK YOUR MEASUREMENTS!
- Make Holes: Level them, mark them, drill them. Use the correct drill bit size for your screws and anchors. You only need a small pilot hole for the screws going into a wood stud.
- Assemble + Install: Screw in floor flanges. Screw in pipe + add caps. Place board on top. Fine tune level + adjust screws as needed.
- TIP: Can place a small piece of felt strip on the pipe to help with uneven parts of wood.

We love how these quick DIYs completed our Man Cave decor. And we got to play with fire, which made it even more fun! Be sure to let us know if you try one of these out - and send us pictures with #afterhideit.