"How do I clean the PS5?" That's a common question we hear. While cleaning the PS4 was easy enough, Sony made cleaning the PlayStation 5 even easier without voiding your warranty! HIDEit is here to help with some tips to keep your Sony PlayStation 5 clean to keep it working longer.
Tools You’ll Need
- Can of Air
- Vacuum
- Microfiber Cloth
- T9 Screwdriver (to remove the fan)
- A Soft Brush (optional)
Before You Start
It might seem obvious, but be sure to completely power down your console and unplug any HDMI cables, power plugs and USB-C cables you might have connected. If you have the Disc Edition of the PS5, be sure to eject the PS5 game disc, as well. And while this process shouldn’t affect the SSD, take the safe route and backup all your saves to an external hard drive or the PlayStation Plus Cloud.
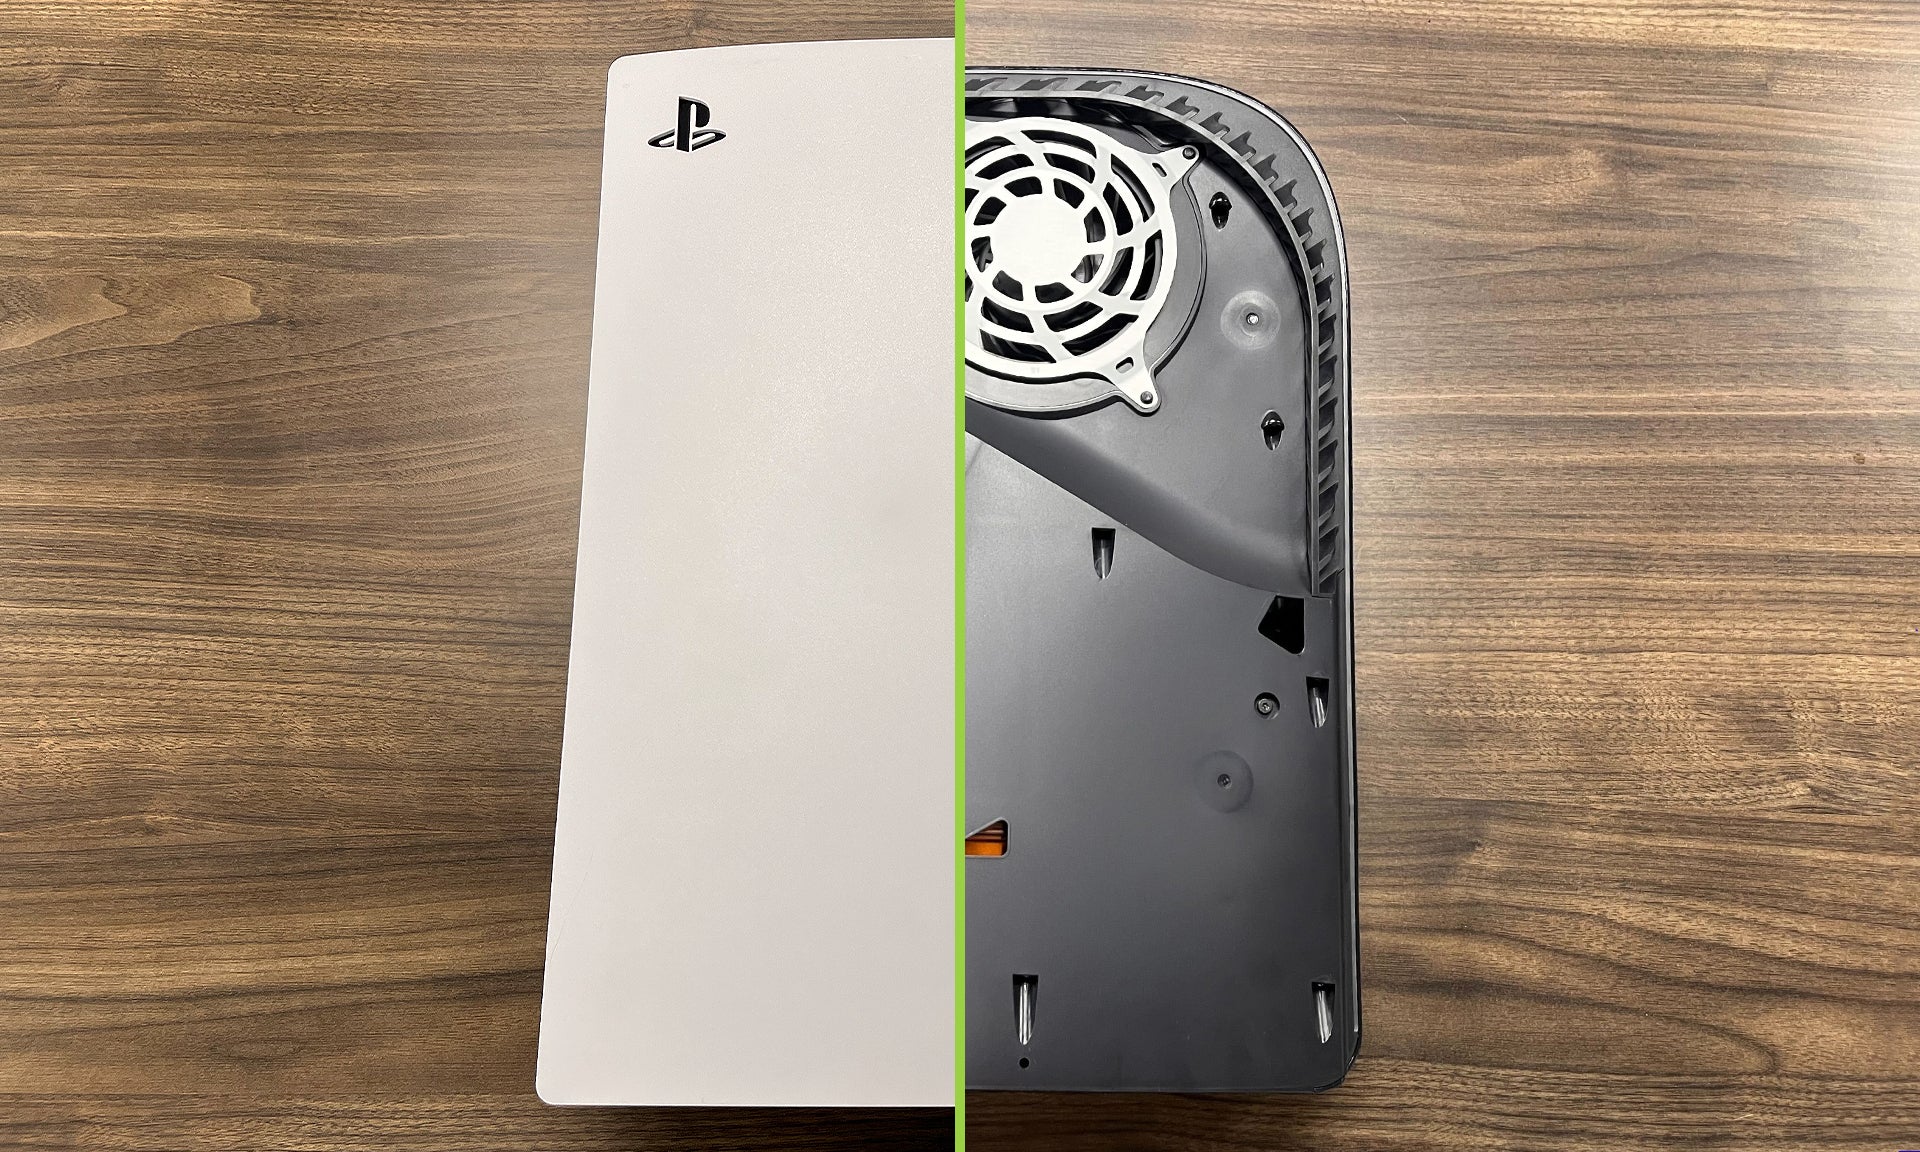
Step 1: Remove the Side Plates
The first step is simple enough: remove the side panels of the PS5 console. You know, the white panels that most people agree aren’t the most flattering. Sony made this as easy as possible since this is where the Expansion Slot is located underneath.
Start by removing the panel with the PlayStation logo on it, which is considered the top cover. Face the power button towards you and grab the bottom left of the panel by moving slightly up and to the right. Be gentle with this motion as you don’t want to bend the cover.

Flip the console over for the bottom cover. Grab the top right of the panel and begin gently peeling back. Grab the bottom of the cover. Pull up and to the right to remove the cover. There is a possibility that you’ll scratch the console, but as long as you put the panels back on the PS5, it won’t matter.
It might take a bit more force than you expect, so we recommend being as gentle as possible. Now that you’ve removed both covers, it’s time to start cleaning the PS5.
Step 2: Clean the Catchers
After removing the PS5 panels, it’s time to start cleaning.
Sony wisely designed the PlayStation 5 console to be incredibly easy to clean and even included dust catchers built into the console. Where are they though? You’ll see triangular openings on the console, one near the middle edge of the console and the other near the bottom, that are dust catchers. How do you clean them?

Easy, take a vacuum hose and suck all that dust up! You'll need a VERY small hose attachment to reach within the catchers. If you don't, use the soft brush to reach the dust. You can also use the microfiber cloth.
Step 3 (Optional): Remove the Fan
This step is completely optional and requires an additional screwdriver, but is worth your time and effort.
Sony designed the PS5’s fan to be easily removed without voiding the warranty and can even be replaced (take precaution if you’re planning to replace it though).
You'll need to remove the small grating around the top edge of the console to gain access to one of the screws. Simply grab it and pull up. You'll hear it start to separate from the PS5. Continue this process until the grate is removed.
Take your screwdriver and remove the four screws holding the metal cover in place. Take note of the location and size differences of each screw.

You can clean the fan without removing the fan by wiping it down with your microfiber cloth and canned air. Don't forget to clean inside the PS5 where the fan rests.
If you want to change the PS5 fan, you'll notice a black cover on top of the fan connector. You'll need to remove this cover (we wedged a small tool in the opening) to swap the fan out. You more than likely won't need to change the fan during this process, but if you want to upgrade, now's the time.
Step 4: Air It Out
From here you’ll want to take the canned air and gently spray it over the console to remove any loose dust. This is also a good time to clean up the grated openings you see when you removed the side panels earlier. Get into some of the nooks and crannies with the air, as well, to help. This step doesn’t have to be a huge focus, but it’ll help maintain your PS5 in the long run.
Step 5: Wipe It Down
Now that you’ve aired the PS5 out, it’s time to take that microfiber cloth and wipe the console down. This should only take a minute and helps catch any remaining dust that might have been released after taking the canned air to the device.
Step 6: Build It Back, Better
You’ve now taken the time to clean your PS5 console, it’s now time to put it all back together. If you decided to clean the fan, insert it back into the console, plug it in and screw the metal cover on before putting the panels back. Once the fan is back in, gently snap the covers back in place and do a final tug to ensure a tight fit.
You’ll want to make sure these panels are secure as it’s a part of the design of the console and works perfectly with the HIDEit PS5 Wall Mount since the top hook keeps the console stable while mounted!
There you have it, a simple guide to cleaning your PS5! Sony has made it even easier to ensure your console lasts a lifetime thanks to the dust catchers and easily removable outer shell. You can always dig deeper into the console, but that will void any warranty you might have as well as requires more tools and steps. Use this time to upgrade your console, as well, with a new NVMe SSD, and be on the lookout for the official Sony PS5 console covers to bring more color to the console!